From Muthuvel Kumaran, Kaavian Systems
In this tutorial Muthuvel show how to generate Purchase Order using LSMW in Standard Batch/Direct Input Method using two flat files for generating the PO, one file for Header data and another one for Item data.
Step I:
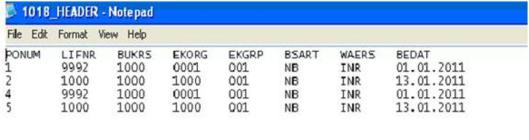
Before, we go to the LSMW Process. Make the Flat files as shown below with the delimiter as ‘Tabulator’.
Header file:
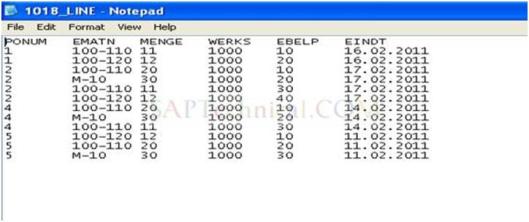
 Item file:
Step II:
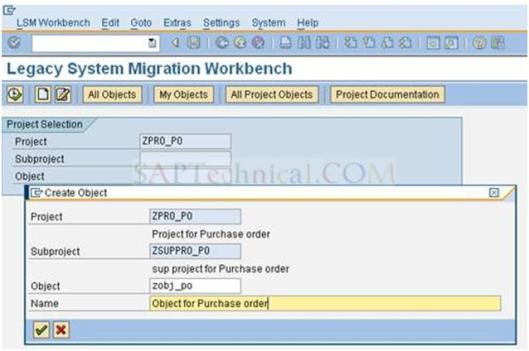
Create an Object in T-Code: LSMW.
Step III:
Press ‘F8’ for Execute the object.
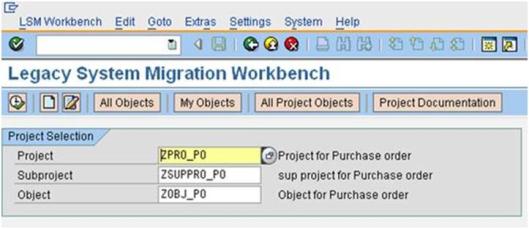 Step IV:
Initial screen for LSMW object
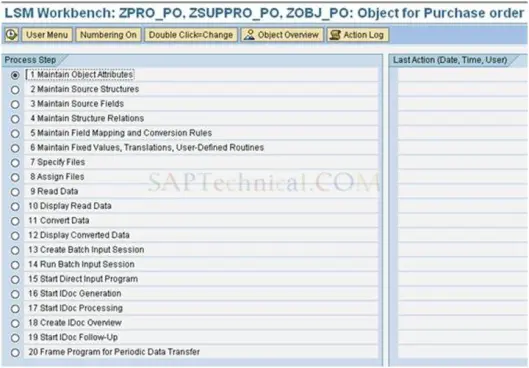
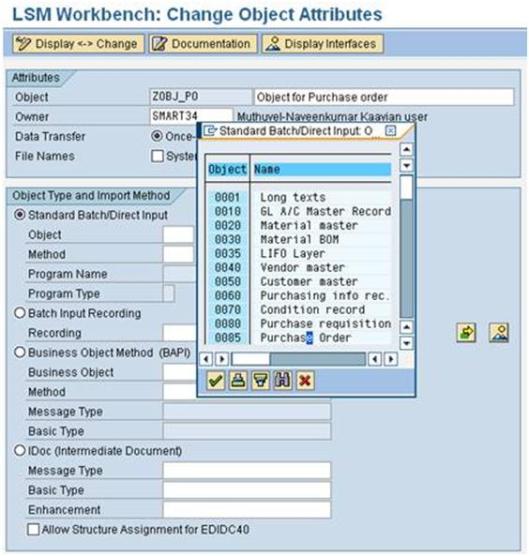
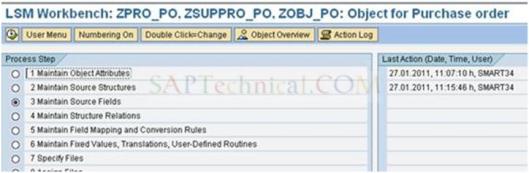
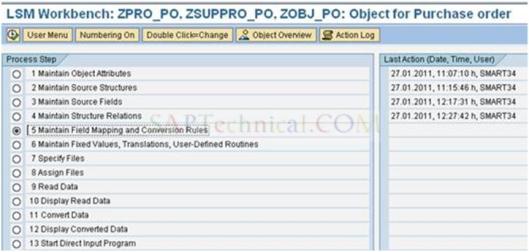
Step 1:
a). Double Click ‘Maintain Object Attributes’ and below screen show and click Standard Batch/Direct Input and click the F4 for Object and select 0085 Purchase order
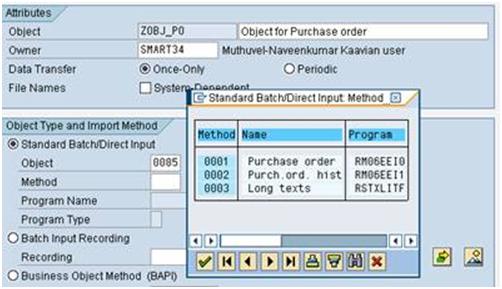
b). Click ‘F4′ for choosing the method and select ‘0001′ ‘Purchase order’ ‘RM06EEI0’ and press Enter. Then Save and Back.
Step2:
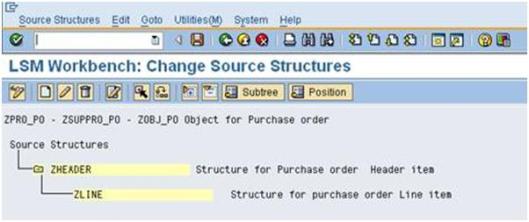
a). Double Click on ‘Maintain Source Structures’ then click create a structure(CTRL+F4)
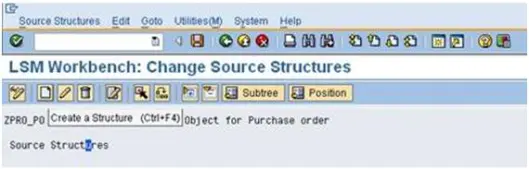
b). Create structure for Header data and Save it.
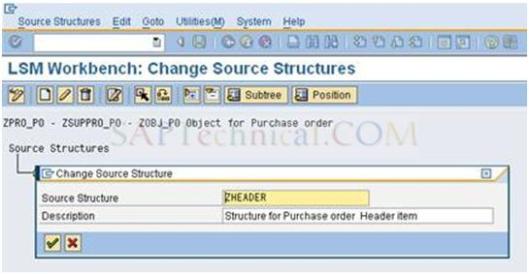
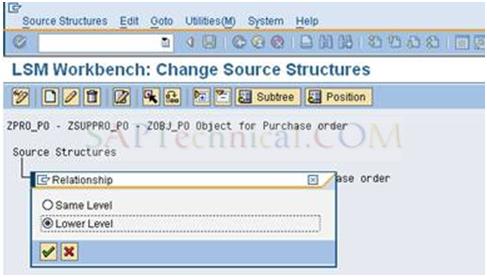
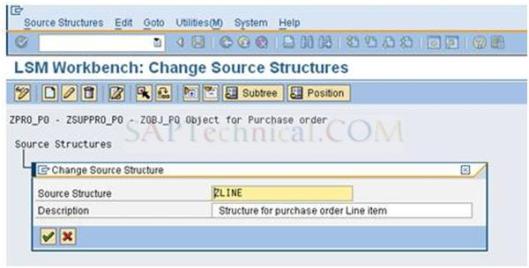
c). Then click the header structure and create the second structure for Item data and define the relationship in Lower level and press Enter.
d). create the source structure for Item data and Save it.
e). You will the screen like this.
Step3:
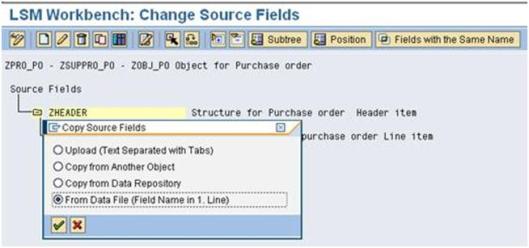
a). Double click on ‘Maintain Source Fields’.
b). click the zheader (source fields) and click the copy fields (CTRL+F8) and select the radio button ‘Date file (Field name is 1.line)’ and press Enter .
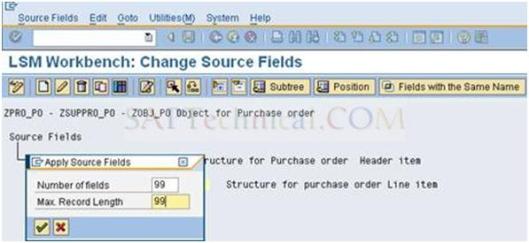
c). Give 99 or more for two fields and press Enter.
d). Browse the header file for source fields and press Enter.
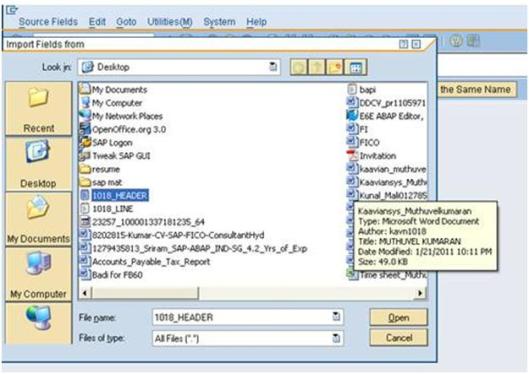
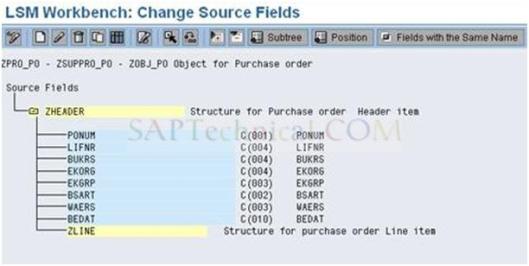
e). Source fields created as below.
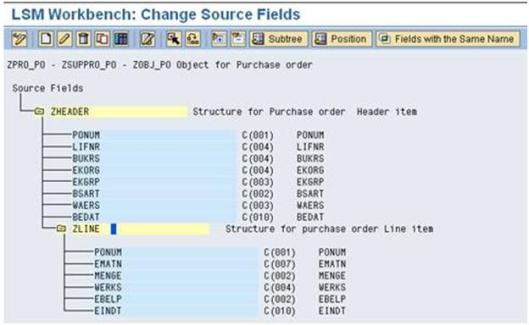
f). Click the zline (source fields) and proceeds the same procedure as above step and the source fields created for Item data, then below screen appears. Finally Save and go Back.
Step4:
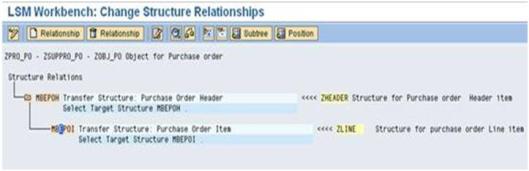
Double click on ‘Maintain Structure Relations’
a). Click the Purchase order header and create the Relationship or CTRL+F4.
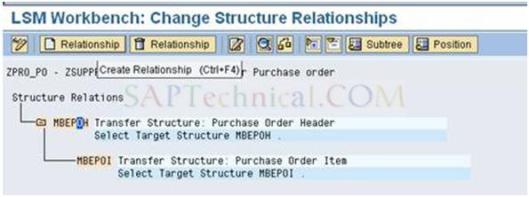
b). After created the relationship for header and select the source structure zheader and press Enter.
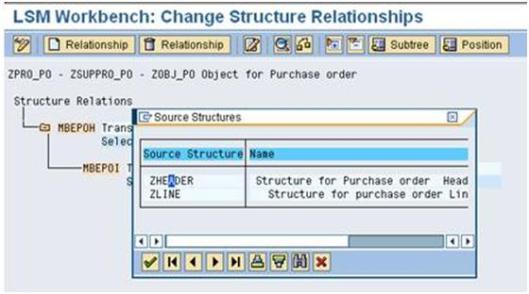
c). Then Click the second one (Purchase order item) and do the same procedure for Create the Relationship and assign source structure for Item.
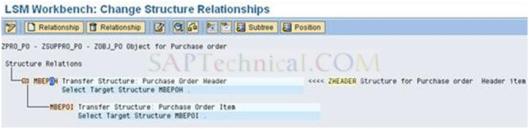
d). Save and Back.
http://www.saptechnical.com/Tutorials/LSMW/PO/Page3.htm
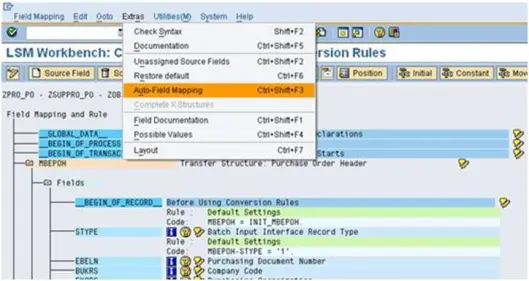
Double click on ‘Maintain Field Mapping and Conversion Rules’.
a). Go to ‘Extra’ in menu bar and select the ‘Auto field mapping‘.
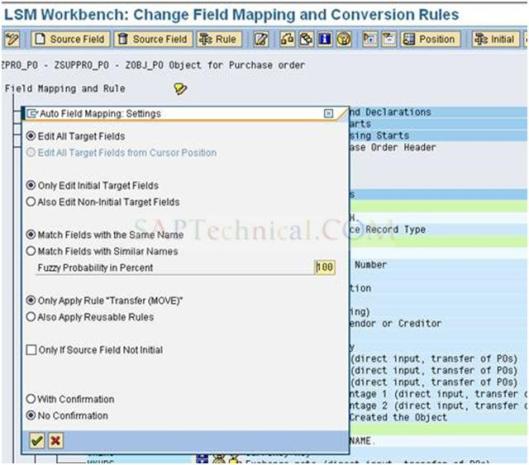
b). Select the Radio button as same as shown in the below screen and press Enter.
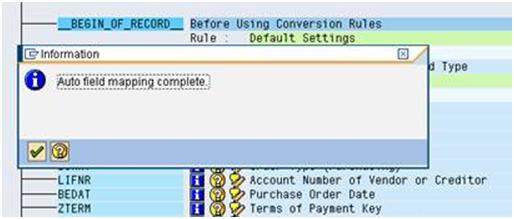
c). You will get the Popup window as shown below and press Enter.
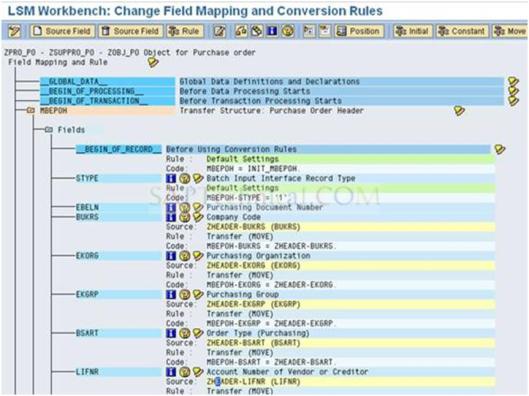
d). After the Auto field mapping completed. You will get the screen like this
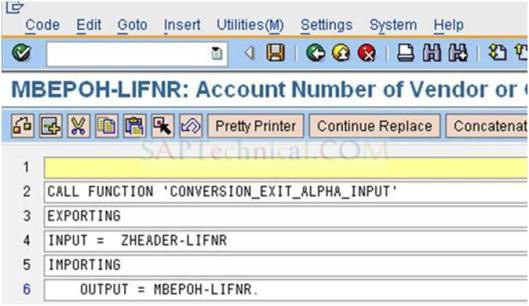
e). Add the code for LIFNR conversion routine and double click on the LIFNR field. You will get this code screen ‘MBEPOH-LIFNR = ZHEADER-LIFNR’.
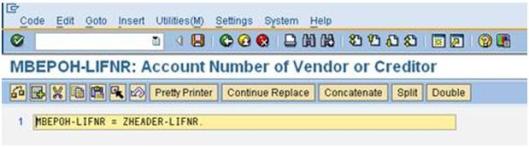 f). Add the code:
CALL FUNCTION ‘CONVERSION_EXIT_ALPHA_INPUT’
EXPORTING
INPUT = ZHEADER-LIFNR
IMPORTING
OUTPUT = MBEPOH-LIFNR.
After entered the code ‘Save and Back (F3)’.
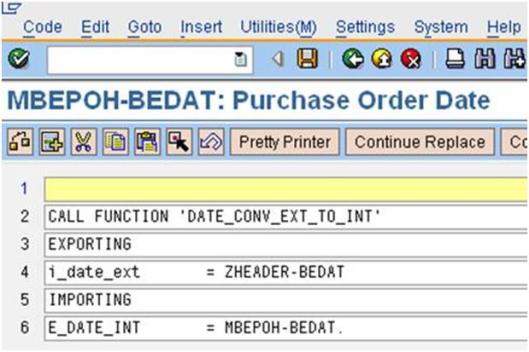
g). Double click the code: ZHEADER-BEDAT (BEDAT) for conversion routine and add the code as shown below:
CALL FUNCTION ‘DATE_CONV_EXT_TO_INT’
EXPORTING
i_date_ext = ZHEADER-BEDAT
IMPORTING
E_DATE_INT = MBEPOH-BEDAT.
After entered the code ‘Save and Back (F3)’.
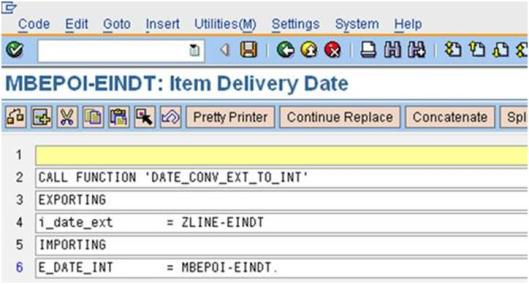
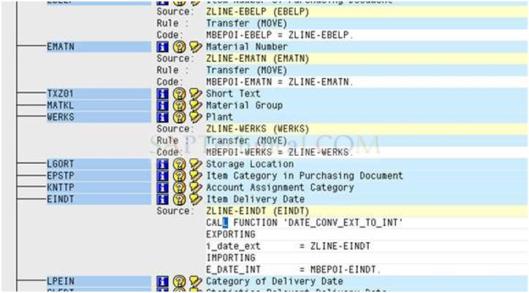
h). Double click on Code: MBEPOI-EINDT = ZLINE-EINDT, then add the below code.
CALL FUNCTION ‘DATE_CONV_EXT_TO_INT’
EXPORTING
i_date_ext = ZLINE-EINDT
IMPORTING
E_DATE_INT = MBEPOH-EINDT.
Then Save and Back (F3).
i). Save and go Back.
http://www.saptechnical.com/Tutorials/LSMW/PO/Page4.htm
Step8:
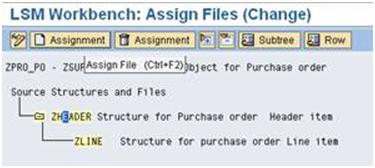
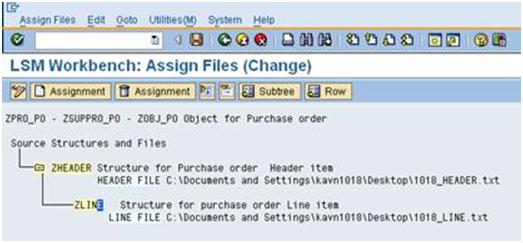
a). Double click on ‘Assign Files’ and click zheader and then click the ‘Assignment‘ button or (CTRL+F2).
b). Select the header file and press Enter.
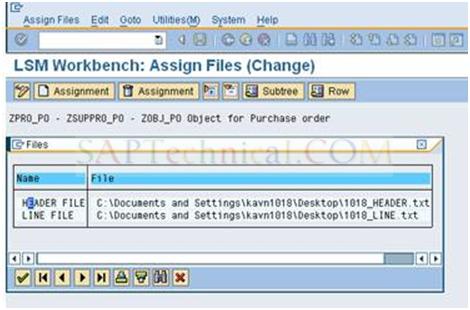
c). Assign files for Item data and click the Assignment button. Then Save and go Back.
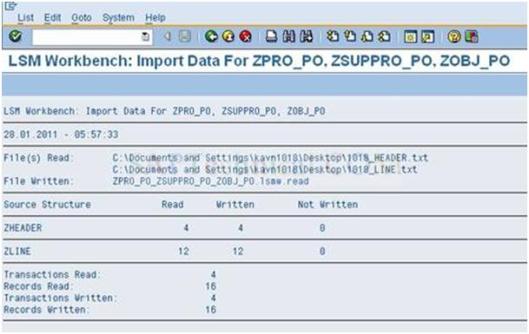
Step9:
a). Double click on ‘Read Data’ and press F8.

b). After the execution and make sure ‘Not written’ is 0 like the below screen and go Back.
Step10:
a). Double click on ‘Display Read Data’ and Dialog screen appears and press Enter.
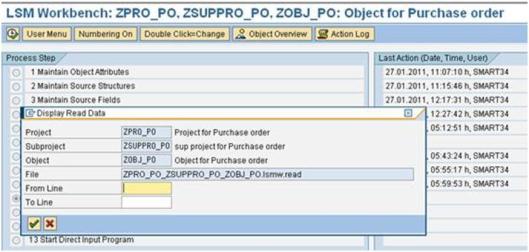
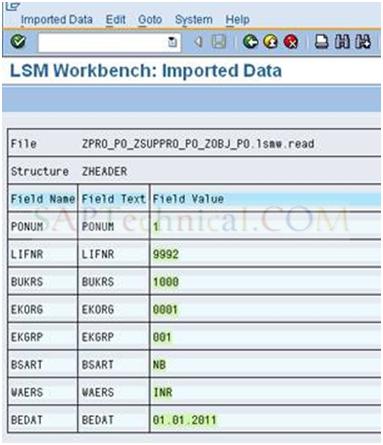
b). If you want to check the data, just double click on the fields.
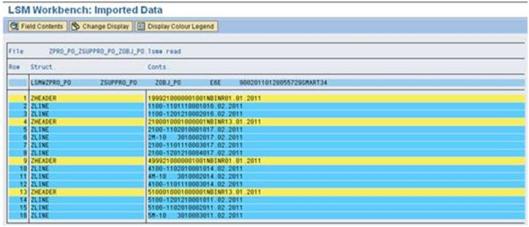
c). Verify the data should be correct or not and go Back.
Step11:
Double click on ‘Convert Data’ and Check with that below screen.
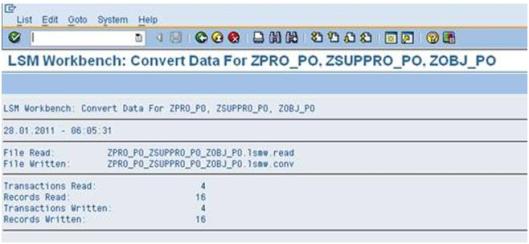
Step12:
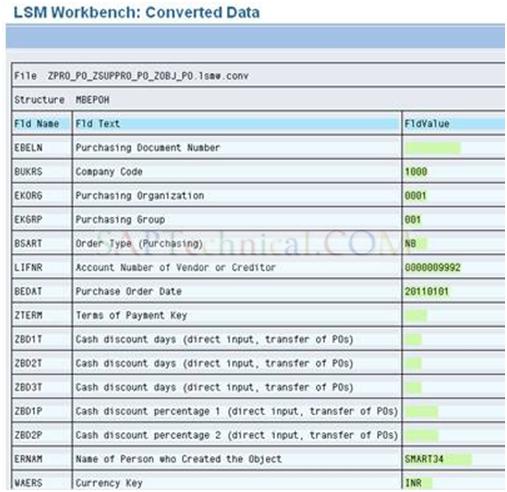
Double click on ‘Display Converted Data’ and Check with that below screen.
Step13:
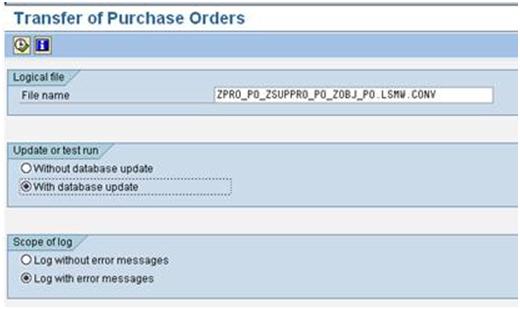
Double click on ‘Start Direct Input Program’ and Click the radio button ‘With database update’ and ‘Log with error messages’. Then press F8.
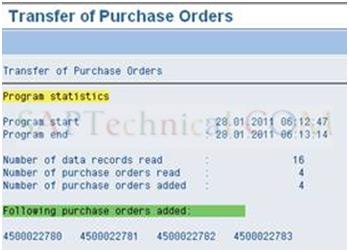
Step V:
Once, the database updated successfully, you will get the screen as shown below and in the meantime Purchase order numbers also created.